
Loading...
Loading...
Loading...
Loading...
Loading...
Loading...
Loading...
Loading...
Loading...
Loading...
Loading...
Loading...
Loading...
Loading...
Loading...
Loading...
Loading...
Loading...
Loading...
Loading...
Loading...
Loading...
Loading...
Loading...
Loading...
Loading...
Loading...
Loading...
Loading...
Loading...
Loading...
Loading...
Loading...
Loading...
Loading...
Loading...
Loading...
Loading...
Loading...
Loading...
Loading...
Loading...
Loading...
Loading...
Loading...
Loading...
Loading...
Loading...
Loading...
Loading...
Loading...
Loading...
Loading...
Loading...
Loading...
Loading...
Loading...
Loading...
Loading...
Loading...
Loading...
Loading...
Loading...
Loading...
Loading...
Loading...
import "@openzeppelin/contracts/proxy/transparent/TransparentUpgradeableProxy.sol";npx hardhat verify --contract contracts/YourContractFile.sol:YourContractName --constructor-args scripts/argument.js --network testnet {contract address}truffle run verify YourContract@{contract address} --network testnet

$ git clone https://github.com/Fantom-foundation/fantom-api-graphql.git$ cd fantom-api-graphql
$ go build -o ./build/apiserver ./cmd/apiserver$ build/apiserverserver:
bind: 127.0.0.1:16761
lachesis:
url: /var/opera/data/lachesis.ipc
log:
level: Debug
mongo:
url: mongodb://127.0.0.1:27017
cors:
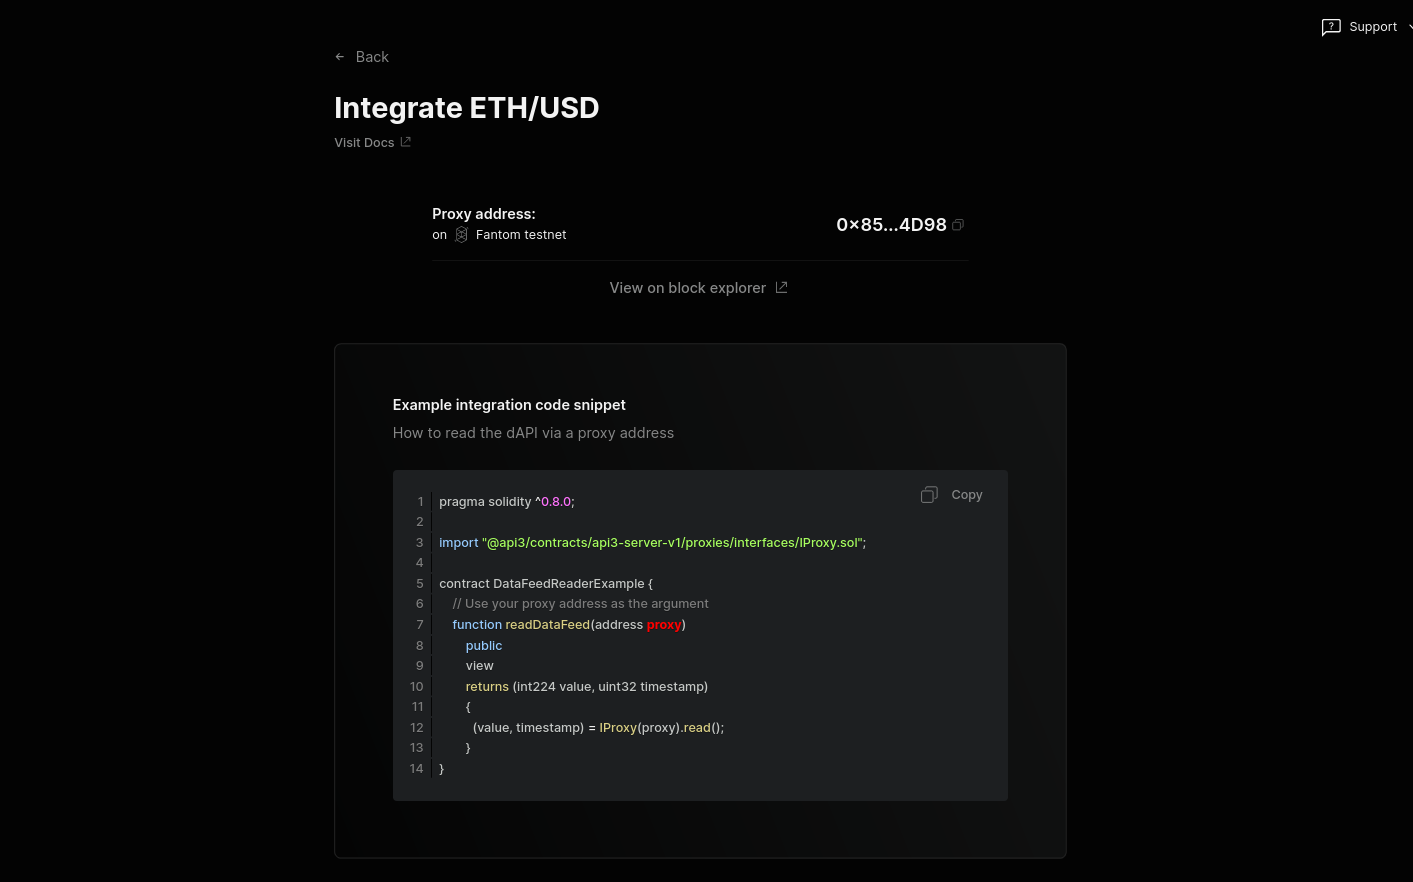
origins: *// SPDX-License-Identifier: MIT
pragma solidity 0.8.17;
import "@openzeppelin/[email protected]/access/Ownable.sol";
import "@api3/contracts/api3-server-v1/proxies/interfaces/IProxy.sol";
contract DataFeedReaderExample is Ownable {
// The proxy contract address obtained from the API3 Market UI.
address public proxyAddress;
// Updating the proxy contract address is a security-critical
// action. In this example, only the owner is allowed to do so.
function setProxyAddress(address _proxyAddress) public onlyOwner {
proxyAddress = _proxyAddress;
}
function readDataFeed()
external
view
returns (int224 value, uint256 timestamp)
{
// Use the IProxy interface to read a dAPI via its
// proxy contract .
(value, timestamp) = IProxy(proxyAddress).read();
// If you have any assumptions about `value` and `timestamp`,
// make sure to validate them after reading from the proxy.
}
}
// SPDX-License-Identifier: None
// Specifies the version of Solidity, using semantic versioning.
// Learn more: https://solidity.readthedocs.io/en/v0.5.10/layout-of-source-files.html#pragma
pragma solidity >=0.8.9;
// Defines a contract named `HelloWorld`.
// A contract is a collection of functions and data (its state). Once deployed, a contract resides at a specific address on the Fantom blockchain. Learn more: https://solidity.readthedocs.io/en/v0.5.10/structure-of-a-contract.html
contract HelloWorld {
//Emitted when update function is called
//Smart contract events are a way for your contract to communicate that something happened on the blockchain to your app front-end, which can be 'listening' for certain events and take action when they happen.
event UpdatedMessages(string oldStr, string newStr);
// Declares a state variable `message` of type `string`.
// State variables are variables whose values are permanently stored in contract storage. The keyword `public` makes variables accessible from outside a contract and creates a function that other contracts or clients can call to access the value.
string public message;
// Similar to many class-based object-oriented languages, a constructor is a special function that is only executed upon contract creation.
// Constructors are used to initialize the contract's data. Learn more:https://solidity.readthedocs.io/en/v0.5.10/contracts.html#constructors
constructor(string memory initMessage) {
// Accepts a string argument `initMessage` and sets the value into the contract's `message` storage variable).
message = initMessage;
}
// A public function that accepts a string argument and updates the `message` storage variable.
function update(string memory newMessage) public {
string memory oldMsg = message;
message = newMessage;
emit UpdatedMessages(oldMsg, newMessage);
}
}forge create HelloWorld --constructor-args "Hello" --contracts CONTRACT_PATH --private-key PRIVATE_KEY --rpc-url HTTPS_ENDPOINTforge create HelloWorld --constructor-args "Hello" --contracts /root/foundry/src/HelloWorld.sol --private-key d8936f6eae35c73a14ea7c1aabb8d068e16889a7f516c8abc482ba4e1489f4cd --rpc-url https://nd-123-456-789.p2pify.com/3c6e0b8a9c15224a8228b9a98ca1531d// Change maxFeePerGas and maxPriorityFeePerGas as per the current gas prices
var transaction = {
to: TO_ADDRESS,
from: address,
nonce: nonceVal,
value: testWeb3.utils.toHex(testWeb3.utils.toWei('0.1', 'ether')),
gas: testWeb3.utils.toHex(21000),
maxFeePerGas: '0x174876E800', // 100 Gwei
maxPriorityFeePerGas: '0xBA43B7400', // 50 Gwei
chainId
};# Install build-essential
(validator)$ sudo apt-get install -y build-essential
# Install go
(validator)$ wget https://go.dev/dl/go1.19.3.linux-amd64.tar.gz
(validator)$ sudo tar -xvf go1.19.3.linux-amd64.tar.gz
(validator)$ sudo mv go /usr/local
# Export go paths
(validator)$ vi ~/.bash_aliases
# Append the following lines
export GOROOT=/usr/local/go
export GOPATH=$HOME/go
export PATH=$GOPATH/bin:$GOROOT/bin:$PATH
#
source ~/.bash_aliases# Install Opera
(validator)$ git clone https://github.com/Fantom-foundation/go-opera.git
(validator)$ cd go-opera/
(validator)$ git checkout release/1.1.3-rc.5
(validator)$ make$./build/opera help
VERSION:
1.1.3-rc.5# Start opera node
(validator)$ cd build/
(validator)$ wget https://download.fantom.network/testnet-6226-no-mpt.g
(validator)$ nohup ./opera --genesis testnet-6226-no-mpt.g --nousb \
--db.preset ldb-1 &
uint storedData;
function set(uint x) public {
storedData = x;
}
function get() public view returns (uint) {
return storedData;
}
}
// SPDX-License-Identifier: MIT
pragma solidity ^0.8.0;
import "@thirdweb-dev/contracts/base/ERC721Base.sol";
contract Contract is ERC721Base {
constructor(
string memory _name,
string memory _symbol,
address _royaltyRecipient,
uint128 _royaltyBps
) ERC721Base(_name, _symbol, _royaltyRecipient, _royaltyBps) {}
}
npx thirdweb deploy
npx thirdweb create contract

query BlocksList {
blocks (cursor: "0x134b7", count: 15) {
totalCount
pageInfo {
first
last
hasNext
hasPrevious
}
edges {
cursor
block {
hash
number
timestamp
transactionCount
}
}
}
}query TransactionsList {
transactions (count: 10) {
totalCount
pageInfo {
first
last
hasNext
hasPrevious
}
edges {
cursor
transaction {
hash
from
to
value
block {
timestamp
}
}
}
}
}pragma solidity ^0.6.7;
import "@chainlink/contracts/src/v0.6/interfaces/AggregatorV3Interface.sol";
contract PriceConsumerV3 {
AggregatorV3Interface internal priceFeed;
/**
* Network: Kovan
* Aggregator: ETH/USD
* Address: 0x9326BFA02ADD2366b30bacB125260Af641031331
*/
constructor() public {
priceFeed = AggregatorV3Interface(0x9326BFA02ADD2366b30bacB125260Af641031331);
}
/**
* Returns the latest price
*/
function getThePrice() public view returns (int) {
(
uint80 roundID,
int price,
uint startedAt,
uint timeStamp,
uint80 answeredInRound
) = priceFeed.latestRoundData();
return price;
}
}npm install -g @graphprotocol/graph-cligraph init --studio <SUBGRAPH_SLUG>$ graph codegen
$ graph build$ graph auth --studio <DEPLOY_KEY>
$ graph deploy --studio <SUBGRAPH_SLUG>{
trades(orderBy: priceETH, orderDirection: desc) {
priceETH
tokenId
}
}
{
"data": {
"trades": [
{
"priceETH": "124457.067524886018255505",
"tokenId": "9998"
},
{
"priceETH": "8000",
"tokenId": "5822"
},
// ...const axios = require('axios');
const graphqlQuery = `{
trades(orderBy: priceETH, orderDirection: desc) {
priceETH
tokenId
}
}`;
const queryUrl = '<https://gateway-arbitrum.network.thegraph.com/api/[api-key]/subgraphs/id/HdVdERFUe8h61vm2fDyycHgxjsde5PbB832NHgJfZNqK>'
const graphQLRequest = {
method: 'post',
url: queryUrl,
data: {
query: graphqlQuery,
},
};
// Send the GraphQL query
axios(graphQLRequest)
.then((response) => {
// Handle the response here
const data = response.data.data
console.log(data)
})
.catch((error) => {
// Handle any errors
console.error(error);
});
# Install build-essential
(validator)$ sudo apt-get install -y build-essential
# Install go
(validator)$ wget https://go.dev/dl/go1.19.3.linux-amd64.tar.gz
(validator)$ sudo tar -xvf go1.19.3.linux-amd64.tar.gz
(validator)$ sudo mv go /usr/local
# Export go paths
(validator)$ vi ~/.bash_aliases
# Append the following lines
export GOROOT=/usr/local/go
export GOPATH=$HOME/go
export PATH=$GOPATH/bin:$GOROOT/bin:$PATH
#
source ~/.bash_aliases# Install Opera
(validator)$ git clone https://github.com/Fantom-foundation/go-opera.git
(validator)$ cd go-opera/
(validator)$ git checkout release/1.1.3-rc.5
(validator)$ make$./build/opera help
VERSION:
1.1.3-rc.5# Start opera node
(validator)$ cd build/
(validator)$ wget https://download.fantom.network/testnet-6226-no-mpt.g
(validator)$ nohup ./opera --genesis testnet-6226-no-mpt.g --nousb \
--db.preset ldb-1 &# Create validator wallet
(validator)$ ./opera account new(validator)$ ./opera validator newYour new key was generated
Public key: 0xPubkey
Path of the secret key file:
- You can share your public key with anyone. Others need it to validate messages from you.
- You must NEVER share the secret key with anyone! The key controls access to your validator!
- You must BACKUP your key file! Without the key, it's impossible to operate the validator!
- You must REMEMBER your password! Without the password, it's impossible to decrypt the key!# Attach to opera console
(validator)$ ./opera attachabi = JSON.parse('[{"anonymous":false,"inputs":[{"indexed":true,"internalType":"uint256","name":"validatorID","type":"uint256"},{"indexed":false,"internalType":"uint256","name":"status","type":"uint256"}],"name":"ChangedValidatorStatus","type":"event"},{"anonymous":false,"inputs":[{"indexed":true,"internalType":"address","name":"delegator","type":"address"},{"indexed":true,"internalType":"uint256","name":"toValidatorID","type":"uint256"},{"indexed":false,"internalType":"uint256","name":"lockupExtraReward","type":"uint256"},{"indexed":false,"internalType":"uint256","name":"lockupBaseReward","type":"uint256"},{"indexed":false,"internalType":"uint256","name":"unlockedReward","type":"uint256"}],"name":"ClaimedRewards","type":"event"},{"anonymous":false,"inputs":[{"indexed":true,"internalType":"uint256","name":"validatorID","type":"uint256"},{"indexed":true,"internalType":"address","name":"auth","type":"address"},{"indexed":false,"internalType":"uint256","name":"createdEpoch","type":"uint256"},{"indexed":false,"internalType":"uint256","name":"createdTime","type":"uint256"}],"name":"CreatedValidator","type":"event"},{"anonymous":false,"inputs":[{"indexed":true,"internalType":"uint256","name":"validatorID","type":"uint256"},{"indexed":false,"internalType":"uint256","name":"deactivatedEpoch","type":"uint256"},{"indexed":false,"internalType":"uint256","name":"deactivatedTime","type":"uint256"}],"name":"DeactivatedValidator","type":"event"},{"anonymous":false,"inputs":[{"indexed":true,"internalType":"address","name":"delegator","type":"address"},{"indexed":true,"internalType":"uint256","name":"toValidatorID","type":"uint256"},{"indexed":false,"internalType":"uint256","name":"amount","type":"uint256"}],"name":"Delegated","type":"event"},{"anonymous":false,"inputs":[{"indexed":true,"internalType":"address","name":"delegator","type":"address"},{"indexed":true,"internalType":"uint256","name":"validatorID","type":"uint256"},{"indexed":false,"internalType":"uint256","name":"duration","type":"uint256"},{"indexed":false,"internalType":"uint256","name":"amount","type":"uint256"}],"name":"LockedUpStake","type":"event"},{"anonymous":false,"inputs":[{"indexed":true,"internalType":"address","name":"previousOwner","type":"address"},{"indexed":true,"internalType":"address","name":"newOwner","type":"address"}],"name":"OwnershipTransferred","type":"event"},{"anonymous":false,"inputs":[{"indexed":true,"internalType":"address","name":"delegator","type":"address"},{"indexed":true,"internalType":"uint256","name":"toValidatorID","type":"uint256"},{"indexed":false,"internalType":"uint256","name":"lockupExtraReward","type":"uint256"},{"indexed":false,"internalType":"uint256","name":"lockupBaseReward","type":"uint256"},{"indexed":false,"internalType":"uint256","name":"unlockedReward","type":"uint256"}],"name":"RestakedRewards","type":"event"},{"anonymous":false,"inputs":[{"indexed":true,"internalType":"address","name":"delegator","type":"address"},{"indexed":true,"internalType":"uint256","name":"toValidatorID","type":"uint256"},{"indexed":true,"internalType":"uint256","name":"wrID","type":"uint256"},{"indexed":false,"internalType":"uint256","name":"amount","type":"uint256"}],"name":"Undelegated","type":"event"},{"anonymous":false,"inputs":[{"indexed":true,"internalType":"address","name":"delegator","type":"address"},{"indexed":true,"internalType":"uint256","name":"validatorID","type":"uint256"},{"indexed":false,"internalType":"uint256","name":"amount","type":"uint256"},{"indexed":false,"internalType":"uint256","name":"penalty","type":"uint256"}],"name":"UnlockedStake","type":"event"},{"anonymous":false,"inputs":[{"indexed":false,"internalType":"uint256","name":"value","type":"uint256"}],"name":"UpdatedBaseRewardPerSec","type":"event"},{"anonymous":false,"inputs":[{"indexed":false,"internalType":"uint256","name":"blocksNum","type":"uint256"},{"indexed":false,"internalType":"uint256","name":"period","type":"uint256"}],"name":"UpdatedOfflinePenaltyThreshold","type":"event"},{"anonymous":false,"inputs":[{"indexed":true,"internalType":"uint256","name":"validatorID","type":"uint256"},{"indexed":false,"internalType":"uint256","name":"refundRatio","type":"uint256"}],"name":"UpdatedSlashingRefundRatio","type":"event"},{"anonymous":false,"inputs":[{"indexed":true,"internalType":"address","name":"delegator","type":"address"},{"indexed":true,"internalType":"uint256","name":"toValidatorID","type":"uint256"},{"indexed":true,"internalType":"uint256","name":"wrID","type":"uint256"},{"indexed":false,"internalType":"uint256","name":"amount","type":"uint256"}],"name":"Withdrawn","type":"event"},{"constant":true,"inputs":[],"name":"baseRewardPerSecond","outputs":[{"internalType":"uint256","name":"","type":"uint256"}],"payable":false,"stateMutability":"view","type":"function"},{"constant":true,"inputs":[],"name":"contractCommission","outputs":[{"internalType":"uint256","name":"","type":"uint256"}],"payable":false,"stateMutability":"pure","type":"function"},{"constant":true,"inputs":[],"name":"currentSealedEpoch","outputs":[{"internalType":"uint256","name":"","type":"uint256"}],"payable":false,"stateMutability":"view","type":"function"},{"constant":true,"inputs":[{"internalType":"uint256","name":"","type":"uint256"}],"name":"getEpochSnapshot","outputs":[{"internalType":"uint256","name":"endTime","type":"uint256"},{"internalType":"uint256","name":"epochFee","type":"uint256"},{"internalType":"uint256","name":"totalBaseRewardWeight","type":"uint256"},{"internalType":"uint256","name":"totalTxRewardWeight","type":"uint256"},{"internalType":"uint256","name":"baseRewardPerSecond","type":"uint256"},{"internalType":"uint256","name":"totalStake","type":"uint256"},{"internalType":"uint256","name":"totalSupply","type":"uint256"}],"payable":false,"stateMutability":"view","type":"function"},{"constant":true,"inputs":[{"internalType":"address","name":"","type":"address"},{"internalType":"uint256","name":"","type":"uint256"}],"name":"getLockupInfo","outputs":[{"internalType":"uint256","name":"lockedStake","type":"uint256"},{"internalType":"uint256","name":"fromEpoch","type":"uint256"},{"internalType":"uint256","name":"endTime","type":"uint256"},{"internalType":"uint256","name":"duration","type":"uint256"}],"payable":false,"stateMutability":"view","type":"function"},{"constant":true,"inputs":[{"internalType":"address","name":"","type":"address"},{"internalType":"uint256","name":"","type":"uint256"}],"name":"getStake","outputs":[{"internalType":"uint256","name":"","type":"uint256"}],"payable":false,"stateMutability":"view","type":"function"},{"constant":true,"inputs":[{"internalType":"address","name":"","type":"address"},{"internalType":"uint256","name":"","type":"uint256"}],"name":"getStashedLockupRewards","outputs":[{"internalType":"uint256","name":"lockupExtraReward","type":"uint256"},{"internalType":"uint256","name":"lockupBaseReward","type":"uint256"},{"internalType":"uint256","name":"unlockedReward","type":"uint256"}],"payable":false,"stateMutability":"view","type":"function"},{"constant":true,"inputs":[{"internalType":"uint256","name":"","type":"uint256"}],"name":"getValidator","outputs":[{"internalType":"uint256","name":"status","type":"uint256"},{"internalType":"uint256","name":"deactivatedTime","type":"uint256"},{"internalType":"uint256","name":"deactivatedEpoch","type":"uint256"},{"internalType":"uint256","name":"receivedStake","type":"uint256"},{"internalType":"uint256","name":"createdEpoch","type":"uint256"},{"internalType":"uint256","name":"createdTime","type":"uint256"},{"internalType":"address","name":"auth","type":"address"}],"payable":false,"stateMutability":"view","type":"function"},{"constant":true,"inputs":[{"internalType":"address","name":"","type":"address"}],"name":"getValidatorID","outputs":[{"internalType":"uint256","name":"","type":"uint256"}],"payable":false,"stateMutability":"view","type":"function"},{"constant":true,"inputs":[{"internalType":"uint256","name":"","type":"uint256"}],"name":"getValidatorPubkey","outputs":[{"internalType":"bytes","name":"","type":"bytes"}],"payable":false,"stateMutability":"view","type":"function"},{"constant":true,"inputs":[{"internalType":"address","name":"","type":"address"},{"internalType":"uint256","name":"","type":"uint256"},{"internalType":"uint256","name":"","type":"uint256"}],"name":"getWithdrawalRequest","outputs":[{"internalType":"uint256","name":"epoch","type":"uint256"},{"internalType":"uint256","name":"time","type":"uint256"},{"internalType":"uint256","name":"amount","type":"uint256"}],"payable":false,"stateMutability":"view","type":"function"},{"constant":true,"inputs":[],"name":"isOwner","outputs":[{"internalType":"bool","name":"","type":"bool"}],"payable":false,"stateMutability":"view","type":"function"},{"constant":true,"inputs":[],"name":"lastValidatorID","outputs":[{"internalType":"uint256","name":"","type":"uint256"}],"payable":false,"stateMutability":"view","type":"function"},{"constant":true,"inputs":[],"name":"maxDelegatedRatio","outputs":[{"internalType":"uint256","name":"","type":"uint256"}],"payable":false,"stateMutability":"pure","type":"function"},{"constant":true,"inputs":[],"name":"maxLockupDuration","outputs":[{"internalType":"uint256","name":"","type":"uint256"}],"payable":false,"stateMutability":"pure","type":"function"},{"constant":true,"inputs":[],"name":"minLockupDuration","outputs":[{"internalType":"uint256","name":"","type":"uint256"}],"payable":false,"stateMutability":"pure","type":"function"},{"constant":true,"inputs":[],"name":"minSelfStake","outputs":[{"internalType":"uint256","name":"","type":"uint256"}],"payable":false,"stateMutability":"pure","type":"function"},{"constant":true,"inputs":[],"name":"owner","outputs":[{"internalType":"address","name":"","type":"address"}],"payable":false,"stateMutability":"view","type":"function"},{"constant":false,"inputs":[],"name":"renounceOwnership","outputs":[],"payable":false,"stateMutability":"nonpayable","type":"function"},{"constant":true,"inputs":[{"internalType":"uint256","name":"","type":"uint256"}],"name":"slashingRefundRatio","outputs":[{"internalType":"uint256","name":"","type":"uint256"}],"payable":false,"stateMutability":"view","type":"function"},{"constant":true,"inputs":[{"internalType":"address","name":"","type":"address"},{"internalType":"uint256","name":"","type":"uint256"}],"name":"stashedRewardsUntilEpoch","outputs":[{"internalType":"uint256","name":"","type":"uint256"}],"payable":false,"stateMutability":"view","type":"function"},{"constant":true,"inputs":[],"name":"totalActiveStake","outputs":[{"internalType":"uint256","name":"","type":"uint256"}],"payable":false,"stateMutability":"view","type":"function"},{"constant":true,"inputs":[],"name":"totalSlashedStake","outputs":[{"internalType":"uint256","name":"","type":"uint256"}],"payable":false,"stateMutability":"view","type":"function"},{"constant":true,"inputs":[],"name":"totalStake","outputs":[{"internalType":"uint256","name":"","type":"uint256"}],"payable":false,"stateMutability":"view","type":"function"},{"constant":true,"inputs":[],"name":"totalSupply","outputs":[{"internalType":"uint256","name":"","type":"uint256"}],"payable":false,"stateMutability":"view","type":"function"},{"constant":false,"inputs":[{"internalType":"address","name":"newOwner","type":"address"}],"name":"transferOwnership","outputs":[],"payable":false,"stateMutability":"nonpayable","type":"function"},{"constant":true,"inputs":[],"name":"unlockedRewardRatio","outputs":[{"internalType":"uint256","name":"","type":"uint256"}],"payable":false,"stateMutability":"pure","type":"function"},{"constant":true,"inputs":[],"name":"validatorCommission","outputs":[{"internalType":"uint256","name":"","type":"uint256"}],"payable":false,"stateMutability":"pure","type":"function"},{"constant":true,"inputs":[],"name":"version","outputs":[{"internalType":"bytes3","name":"","type":"bytes3"}],"payable":false,"stateMutability":"pure","type":"function"},{"constant":true,"inputs":[],"name":"withdrawalPeriodEpochs","outputs":[{"internalType":"uint256","name":"","type":"uint256"}],"payable":false,"stateMutability":"pure","type":"function"},{"constant":true,"inputs":[],"name":"withdrawalPeriodTime","outputs":[{"internalType":"uint256","name":"","type":"uint256"}],"payable":false,"stateMutability":"pure","type":"function"},{"constant":true,"inputs":[],"name":"currentEpoch","outputs":[{"internalType":"uint256","name":"","type":"uint256"}],"payable":false,"stateMutability":"view","type":"function"},{"constant":true,"inputs":[{"internalType":"uint256","name":"epoch","type":"uint256"}],"name":"getEpochValidatorIDs","outputs":[{"internalType":"uint256[]","name":"","type":"uint256[]"}],"payable":false,"stateMutability":"view","type":"function"},{"constant":true,"inputs":[{"internalType":"uint256","name":"epoch","type":"uint256"},{"internalType":"uint256","name":"validatorID","type":"uint256"}],"name":"getEpochReceivedStake","outputs":[{"internalType":"uint256","name":"","type":"uint256"}],"payable":false,"stateMutability":"view","type":"function"},{"constant":true,"inputs":[{"internalType":"uint256","name":"epoch","type":"uint256"},{"internalType":"uint256","name":"validatorID","type":"uint256"}],"name":"getEpochAccumulatedRewardPerToken","outputs":[{"internalType":"uint256","name":"","type":"uint256"}],"payable":false,"stateMutability":"view","type":"function"},{"constant":true,"inputs":[{"internalType":"uint256","name":"epoch","type":"uint256"},{"internalType":"uint256","name":"validatorID","type":"uint256"}],"name":"getEpochAccumulatedUptime","outputs":[{"internalType":"uint256","name":"","type":"uint256"}],"payable":false,"stateMutability":"view","type":"function"},{"constant":true,"inputs":[{"internalType":"uint256","name":"epoch","type":"uint256"},{"internalType":"uint256","name":"validatorID","type":"uint256"}],"name":"getEpochAccumulatedOriginatedTxsFee","outputs":[{"internalType":"uint256","name":"","type":"uint256"}],"payable":false,"stateMutability":"view","type":"function"},{"constant":true,"inputs":[{"internalType":"uint256","name":"epoch","type":"uint256"},{"internalType":"uint256","name":"validatorID","type":"uint256"}],"name":"getEpochOfflineTime","outputs":[{"internalType":"uint256","name":"","type":"uint256"}],"payable":false,"stateMutability":"view","type":"function"},{"constant":true,"inputs":[{"internalType":"uint256","name":"epoch","type":"uint256"},{"internalType":"uint256","name":"validatorID","type":"uint256"}],"name":"getEpochOfflineBlocks","outputs":[{"internalType":"uint256","name":"","type":"uint256"}],"payable":false,"stateMutability":"view","type":"function"},{"constant":true,"inputs":[{"internalType":"address","name":"delegator","type":"address"},{"internalType":"uint256","name":"validatorID","type":"uint256"}],"name":"rewardsStash","outputs":[{"internalType":"uint256","name":"","type":"uint256"}],"payable":false,"stateMutability":"view","type":"function"},{"constant":true,"inputs":[{"internalType":"address","name":"delegator","type":"address"},{"internalType":"uint256","name":"toValidatorID","type":"uint256"}],"name":"getLockedStake","outputs":[{"internalType":"uint256","name":"","type":"uint256"}],"payable":false,"stateMutability":"view","type":"function"},{"constant":false,"inputs":[{"internalType":"uint256","name":"sealedEpoch","type":"uint256"},{"internalType":"uint256","name":"_totalSupply","type":"uint256"},{"internalType":"address","name":"nodeDriver","type":"address"},{"internalType":"address","name":"owner","type":"address"}],"name":"initialize","outputs":[],"payable":false,"stateMutability":"nonpayable","type":"function"},{"constant":false,"inputs":[{"internalType":"address","name":"auth","type":"address"},{"internalType":"uint256","name":"validatorID","type":"uint256"},{"internalType":"bytes","name":"pubkey","type":"bytes"},{"internalType":"uint256","name":"status","type":"uint256"},{"internalType":"uint256","name":"createdEpoch","type":"uint256"},{"internalType":"uint256","name":"createdTime","type":"uint256"},{"internalType":"uint256","name":"deactivatedEpoch","type":"uint256"},{"internalType":"uint256","name":"deactivatedTime","type":"uint256"}],"name":"setGenesisValidator","outputs":[],"payable":false,"stateMutability":"nonpayable","type":"function"},{"constant":false,"inputs":[{"internalType":"address","name":"delegator","type":"address"},{"internalType":"uint256","name":"toValidatorID","type":"uint256"},{"internalType":"uint256","name":"stake","type":"uint256"},{"internalType":"uint256","name":"lockedStake","type":"uint256"},{"internalType":"uint256","name":"lockupFromEpoch","type":"uint256"},{"internalType":"uint256","name":"lockupEndTime","type":"uint256"},{"internalType":"uint256","name":"lockupDuration","type":"uint256"},{"internalType":"uint256","name":"earlyUnlockPenalty","type":"uint256"},{"internalType":"uint256","name":"rewards","type":"uint256"}],"name":"setGenesisDelegation","outputs":[],"payable":false,"stateMutability":"nonpayable","type":"function"},{"constant":false,"inputs":[{"internalType":"bytes","name":"pubkey","type":"bytes"}],"name":"createValidator","outputs":[],"payable":true,"stateMutability":"payable","type":"function"},{"constant":true,"inputs":[{"internalType":"uint256","name":"validatorID","type":"uint256"}],"name":"getSelfStake","outputs":[{"internalType":"uint256","name":"","type":"uint256"}],"payable":false,"stateMutability":"view","type":"function"},{"constant":false,"inputs":[{"internalType":"uint256","name":"toValidatorID","type":"uint256"}],"name":"delegate","outputs":[],"payable":true,"stateMutability":"payable","type":"function"},{"constant":false,"inputs":[{"internalType":"uint256","name":"toValidatorID","type":"uint256"},{"internalType":"uint256","name":"wrID","type":"uint256"},{"internalType":"uint256","name":"amount","type":"uint256"}],"name":"undelegate","outputs":[],"payable":false,"stateMutability":"nonpayable","type":"function"},{"constant":true,"inputs":[{"internalType":"uint256","name":"validatorID","type":"uint256"}],"name":"isSlashed","outputs":[{"internalType":"bool","name":"","type":"bool"}],"payable":false,"stateMutability":"view","type":"function"},{"constant":false,"inputs":[{"internalType":"uint256","name":"toValidatorID","type":"uint256"},{"internalType":"uint256","name":"wrID","type":"uint256"}],"name":"withdraw","outputs":[],"payable":false,"stateMutability":"nonpayable","type":"function"},{"constant":false,"inputs":[{"internalType":"uint256","name":"validatorID","type":"uint256"},{"internalType":"uint256","name":"status","type":"uint256"}],"name":"deactivateValidator","outputs":[],"payable":false,"stateMutability":"nonpayable","type":"function"},{"constant":true,"inputs":[{"internalType":"address","name":"delegator","type":"address"},{"internalType":"uint256","name":"toValidatorID","type":"uint256"}],"name":"pendingRewards","outputs":[{"internalType":"uint256","name":"","type":"uint256"}],"payable":false,"stateMutability":"view","type":"function"},{"constant":false,"inputs":[{"internalType":"address","name":"delegator","type":"address"},{"internalType":"uint256","name":"toValidatorID","type":"uint256"}],"name":"stashRewards","outputs":[],"payable":false,"stateMutability":"nonpayable","type":"function"},{"constant":false,"inputs":[{"internalType":"uint256","name":"toValidatorID","type":"uint256"}],"name":"claimRewards","outputs":[],"payable":false,"stateMutability":"nonpayable","type":"function"},{"constant":false,"inputs":[{"internalType":"uint256","name":"toValidatorID","type":"uint256"}],"name":"restakeRewards","outputs":[],"payable":false,"stateMutability":"nonpayable","type":"function"},{"constant":false,"inputs":[{"internalType":"uint256","name":"validatorID","type":"uint256"},{"internalType":"bool","name":"syncPubkey","type":"bool"}],"name":"_syncValidator","outputs":[],"payable":false,"stateMutability":"nonpayable","type":"function"},{"constant":true,"inputs":[],"name":"offlinePenaltyThreshold","outputs":[{"internalType":"uint256","name":"blocksNum","type":"uint256"},{"internalType":"uint256","name":"time","type":"uint256"}],"payable":false,"stateMutability":"view","type":"function"},{"constant":false,"inputs":[{"internalType":"uint256","name":"value","type":"uint256"}],"name":"updateBaseRewardPerSecond","outputs":[],"payable":false,"stateMutability":"nonpayable","type":"function"},{"constant":false,"inputs":[{"internalType":"uint256","name":"blocksNum","type":"uint256"},{"internalType":"uint256","name":"time","type":"uint256"}],"name":"updateOfflinePenaltyThreshold","outputs":[],"payable":false,"stateMutability":"nonpayable","type":"function"},{"constant":false,"inputs":[{"internalType":"uint256","name":"validatorID","type":"uint256"},{"internalType":"uint256","name":"refundRatio","type":"uint256"}],"name":"updateSlashingRefundRatio","outputs":[],"payable":false,"stateMutability":"nonpayable","type":"function"},{"constant":false,"inputs":[{"internalType":"uint256[]","name":"offlineTime","type":"uint256[]"},{"internalType":"uint256[]","name":"offlineBlocks","type":"uint256[]"},{"internalType":"uint256[]","name":"uptimes","type":"uint256[]"},{"internalType":"uint256[]","name":"originatedTxsFee","type":"uint256[]"}],"name":"sealEpoch","outputs":[],"payable":false,"stateMutability":"nonpayable","type":"function"},{"constant":false,"inputs":[{"internalType":"uint256[]","name":"nextValidatorIDs","type":"uint256[]"}],"name":"sealEpochValidators","outputs":[],"payable":false,"stateMutability":"nonpayable","type":"function"},{"constant":true,"inputs":[{"internalType":"address","name":"delegator","type":"address"},{"internalType":"uint256","name":"toValidatorID","type":"uint256"}],"name":"isLockedUp","outputs":[{"internalType":"bool","name":"","type":"bool"}],"payable":false,"stateMutability":"view","type":"function"},{"constant":true,"inputs":[{"internalType":"address","name":"delegator","type":"address"},{"internalType":"uint256","name":"toValidatorID","type":"uint256"}],"name":"getUnlockedStake","outputs":[{"internalType":"uint256","name":"","type":"uint256"}],"payable":false,"stateMutability":"view","type":"function"},{"constant":false,"inputs":[{"internalType":"uint256","name":"toValidatorID","type":"uint256"},{"internalType":"uint256","name":"lockupDuration","type":"uint256"},{"internalType":"uint256","name":"amount","type":"uint256"}],"name":"lockStake","outputs":[],"payable":false,"stateMutability":"nonpayable","type":"function"},{"constant":false,"inputs":[{"internalType":"uint256","name":"toValidatorID","type":"uint256"},{"internalType":"uint256","name":"amount","type":"uint256"}],"name":"unlockStake","outputs":[{"internalType":"uint256","name":"","type":"uint256"}],"payable":false,"stateMutability":"nonpayable","type":"function"}]')sfcc = web3.ftm.contract(abi).at("0xfc00face00000000000000000000000000000000")// Sanity check
sfcc.lastValidatorID() // if everything is all right, will return a non-zero value# Get your validator id
sfcc.getValidatorID("{VALIDATOR_WALLET_ADDRESS}")# Unlock validator wallet
personal.unlockAccount("{VALIDATOR_WALLET_ADDRESS}", "{PASSWORD}", 60)# Register your validator
tx = sfcc.createValidator("0xYOUR_PUBKEY", {from:"0xYOUR_ADDRESS", value: web3.toWei("500000.0", "ftm")}) // 500000.0 FTM# Check your registration transaction
ftm.getTransactionReceipt(tx)# Get your validator id
sfc.getValidatorID("{VALIDATOR_WALLET_ADDRESS}")(validator)$ nohup ./opera --genesis testnet.g --nousb \
--validator.id ID --validator.pubkey 0xPubkey --validator.password /path/to/password &
sudo apt-get install -y build-essential gitsudo rm -rf /usr/local/go
wget https://go.dev/dl/go1.22.4.linux-amd64.tar.gz
sudo tar -xzf go1.22.4.linux-amd64.tar.gz -C /usr/local/
rm -f go1.22.4.linux-amd64.tar.gzsudo tee /etc/profile.d/golang.sh > /dev/null <<EOT
export GOROOT=/usr/local/go
export GOPATH=\$HOME/go
export PATH=\$PATH:\$GOROOT/bin:\$GOPATH/bin
EOT
source /etc/profile.d/golang.shgit clone https://github.com/Fantom-foundation/Sonic.git
cd Sonic
git fetch --tags && git checkout -b v1.2.1-c tags/v1.2.1-c
make allbuild/sonicd versionsudo mv build/sonic* /usr/local/bin/wget https://files.fantom.network/mainnet-285300-archive.g
wget https://files.fantom.network/mainnet-285300-archive.g.md5$ md5sum --check mainnet-285300-archive.g.md5
mainnet-285300-archive.g: OKGOMEMLIMIT=58GiB sonictool \
--datadir ~/.sonic \
--cache 25600 \
genesis mainnet-285300-archive.gStateDB imported successfully, stateRoot matches module=gossip-store
index=81990246 root="f60cd4…38652f"$ grep MemTotal /proc/meminfo
MemTotal: 65641928 kBGOMEMLIMIT=58GiB sonicd \
--datadir ~/.sonic \
--cache 25600 \
--http \
--http.addr=0.0.0.0 \
--http.port=8080 \
--http.corsdomain="*" \
--http.vhosts="*" \
--http.api=eth,web3,net,ftm,txpool,abft,dag \
--ws \
--ws.addr=0.0.0.0 \
--ws.port=8081 \
--ws.origins="*" \
--ws.api=eth,web3,net,ftm,txpool,abft,dagstruct ReferenceData {
uint256 rate; // base/quote exchange rate, multiplied by 1e18.
uint256 lastUpdatedBase; // UNIX epoch of the last time when base price gets updated.
uint256 lastUpdatedQuote; // UNIX epoch of the last time when quote price gets updated.
}const { Client } = require('@bandprotocol/bandchain.js');
// BandChain's REST Endpoint
const endpoint = 'https://rpc.bandchain.org';
const client = new Client(endpoint);
// This example demonstrates how to query price data from
// Band's standard dataset
async function exampleGetReferenceData() {
const rate = await client.getReferenceData(['BTC/ETH','BAND/EUR', 'FTM/USD']);
return rate;
}
(async () => {
console.log(await exampleGetReferenceData());
})();
$ node index.js
[
{
pair: 'BTC/ETH',
rate: 30.998744363906173,
updatedAt: { base: 1615866954, quote: 1615866954 },
requestID: { base: 2206590, quote: 2206590 }
},
{
pair: 'BAND/EUR',
rate: 10.566138918332376,
updatedAt: { base: 1615866845, quote: 1615866911 },
requestID: { base: 2206539, quote: 2206572 }
},
{
pair: 'FTM/USD',
rate: 0.36662363,
updatedAt: { base: 1615866851, quote: 1615866960 },
requestID: { base: 2206543, quote: 0 }
}
]decimals is then the exponent by which rate was multiplied by to get rawRate.


GiB
sudo apt-get install -y build-essential gitsudo rm -rf /usr/local/go
wget https://go.dev/dl/go1.22.8.linux-amd64.tar.gz
sudo tar -xzf go1.22.8.linux-amd64.tar.gz -C /usr/local/
rm -f go1.22.8.linux-amd64.tar.gzsudo tee /etc/profile.d/golang.sh > /dev/null <<EOT
export GOROOT=/usr/local/go
export GOPATH=\$HOME/go
export PATH=\$PATH:\$GOROOT/bin:\$GOPATH/bin
EOT
source /etc/profile.d/golang.shgit clone https://github.com/Fantom-foundation/Sonic.git
cd Sonic
git fetch --tags && git checkout -b v1.2.1-g tags/v1.2.1-g
make allbuild/sonicd versionsudo mv build/sonic* /usr/local/bin/wget https://files.fantom.network/opera/mainnet/mainnet-311670-validator.g
wget https://files.fantom.network/opera/mainnet/mainnet-311670-validator.g.md5$ md5sum --check mainnet-311670-validator.g.md5
mainnet-311670-validator.g: OKGOMEMLIMIT=58GiB sonictool --datadir ~/.sonic --cache 25600 \
genesis --mode validator mainnet-311670-validator.gStateDB imported successfully, stateRoot matches module=gossip-store
index=95005860 root="cd16ca…cf69c2"$ grep MemTotal /proc/meminfo
MemTotal: 65641928 kBGOMEMLIMIT=58GiB sonicd --datadir ~/.sonic --cache 25600 --mode validatorsonictool --datadir ~/.sonic account newsonictool --datadir ~/.sonic validator newpkill sonicdGOMEMLIMIT=58GiB sonicd \
--datadir ~/.sonic \
--cache 25600 \
--mode validator \
--validator.id <your validator ID> \
--validator.pubkey <your public key, i.e. 0xc00472c4966b0213…> \
--validator.password <path to a file with the public key password>

toBlock: Quantity or Tag — (optional) To this block.StringStringStringto — Address, target of the transaction$ opera --genesis /path/to/genesis.g --tracenode--http.api=eth,web3,net,ftm,traceopera \
--genesis=/datadir/mainnet-5577-full-mpt.g \
--port=5050 \
--maxpeers=200 \
--datadir=/datadir \
--http \
--http.addr=0.0.0.0 \
--http.port=18545 \
--http.corsdomain="*" \
--http.vhosts="*" \
--ws \
--ws.addr=0.0.0.0 \
--ws.port=18546 \
--ws.origins="*" \
--nousb \
--db.preset pbl-1 \
--tracenode \
--http.api=eth,web3,net,ftm,traceopera --tracenode --datadir=/path/to/opera/datadir export txtraces filename.gz 10000000 11000000opera --tracenode --datadir=/path/to/opera/datadir import txtraces filename.gzopera --tracenode --datadir=/path/to/opera/datadir delete txtraces 10000000 11000000params: [
"0x22DB3E" // 2284350
]curl --data '{"method":"trace_block","params":["0x22DB3E"],"id":1,"jsonrpc":"2.0"}' -H "Content-Type: application/json" -X POST https://rpcapi-tracing.fantom.network{
"jsonrpc":"2.0",
"id":1,
"result":[
{
"action":{
"callType":"call",
"from":"0x740c82e9009738b3ab6080e89da964a4704a6cba",
"to":"0xd4e0aca70d1fe8979e7e1015b30a2085803d0244",
"value":"0x0",
"gas":"0x689e",
"input":"0x6930fd2a0000000000000000000000000000000000000000000000000000000000000608"
},
"blockHash":"0x00000ce000001cf16b859ccacc281e32e2c17730ce48b3498bf1f7f05d90fe5c",
"blockNumber":2284350,
"result":{
"gasUsed":"0x688f",
"output":"0x"
},
"subtraces":1,
"traceAddress":[
],
"transactionHash":"0x58846dd2a9fa3ea9e700838db48fd9829ebbc95e103142ac7968f658fd1ed3ac",
"transactionPosition":0,
"type":"call"
},
{
"action":{
"callType":"delegatecall",
"from":"0xd4e0aca70d1fe8979e7e1015b30a2085803d0244",
"to":"0x1125eabf1eba69ef00266b7a038141474d8afff1",
"value":"0x0",
"gas":"0x125c",
"input":"0x6930fd2a0000000000000000000000000000000000000000000000000000000000000608"
},
"blockHash":"0x00000ce000001cf16b859ccacc281e32e2c17730ce48b3498bf1f7f05d90fe5c",
"blockNumber":2284350,
"result":{
"gasUsed":"0xf62",
"output":"0x"
},
"subtraces":0,
"traceAddress":[
0
],
"transactionHash":"0x58846dd2a9fa3ea9e700838db48fd9829ebbc95e103142ac7968f658fd1ed3ac",
"transactionPosition":0,
"type":"call"
}
]
}params: ["0x58846dd2a9fa3ea9e700838db48fd9829ebbc95e103142ac7968f658fd1ed3ac"]curl --data '{"method":"trace_transaction","params":["0x58846dd2a9fa3ea9e700838db48fd9829ebbc95e103142ac7968f658fd1ed3ac"],"id":1,"jsonrpc":"2.0"}' -H "Content-Type: application/json" -X POST https://rpcapi-tracing.fantom.networkparams: [{
"fromBlock": "0x22DB29", // 2284329
"toBlock": "0x22DB34", // 2284340
"toAddress": ["0xda7a001b254cd22e46d3eab04d937489c93174c3"],
"after": 20,
"count": 10
}]curl -H "Content-Type: application/json" -X POST --data '{"method":"trace_filter","params":[{"fromBlock":"0x22DB29", "toBlock":"0x22DB34", "fromAddress":["0xda7a001b254cd22e46d3eab04d937489c93174c3"], "count":10, "after":20}],"id":1,"jsonrpc":"2.0"}' https://rpcapi-tracing.fantom.networkparams: [
"0x58846dd2a9fa3ea9e700838db48fd9829ebbc95e103142ac7968f658fd1ed3ac",
["0x0"]
]curl -H "Content-Type: application/json" -X POST --data '{"method":"trace_get","params":["0x58846dd2a9fa3ea9e700838db48fd9829ebbc95e103142ac7968f658fd1ed3ac",["0x0"]],"id":1,"jsonrpc":"2.0"}' https://rpcapi-tracing.fantom.networkcurl -H "Content-Type: application/json" -X POST --data '{"method":"debug_traceBlockByNumber","params":["0x2F5DD49"],"id":1,"jsonrpc":"2.0"}' https://rpcapi-tracing.fantom.networkcurl -H "Content-Type: application/json" -X POST --data '{"method":"debug_traceBlockByHash","params":["0x0002825a0000008c2bc8a86b966c34797db3c21916ca033f4bd68461801217d0"],"id":1,"jsonrpc":"2.0"}' https://rpcapi-tracing.fantom.networkcurl -H "Content-Type: application/json" -X POST --data '{"method":"debug_traceTransaction","params":["0xa6598be1f06b0aff5caddec2685ec53599f064f7b8ff9eaded0a719a378c8802"],"id":1,"jsonrpc":"2.0"}' https://rpcapi-tracing.fantom.network```js
const response = await Moralis.EvmApi.nft.getWalletNFTs({
"chain": "0x1",
"format": "decimal",
"mediaItems": false,
"address": "0x1f9090aaE28b8a3dCeaDf281B0F12828e676c326"
});
``````json
{
"page": 1,
"page_size": 100,
"cursor": null,
"result": [
{
"token_address": "0xbd3531da5cf5857e7cfaa92426877b022e612cf8",
"token_id": "8165",
"owner_of": "0x3e18e3987b3b73f4e7cb80e2b25776df7a30bb8b",
"block_number": "18333219",
"block_number_minted": "12878275",
"token_hash": "f7d53f87dc31367e148b2ec957cb585b",
"amount": "1",
"possible_spam": false,
"contract_type": "ERC721",
"name": "PudgyPenguins",
"symbol": "PPG",
"token_uri": "https://ipfs.moralis.io:2053/ipfs/bafybeibc5sgo2plmjkq2tzmhrn54bk3crhnc23zd2msg4ea7a4pxrkgfna/8165",
"metadata": "{\"attributes\":[{\"trait_type\":\"Background\",\"value\":\"Tangerine\"},{\"trait_type\":\"Skin\",\"value\":\"Normal\"},{\"trait_type\":\"Body\",\"value\":\"Kimono Orange\"},{\"trait_type\":\"Face\",\"value\":\"Squad\"},{\"trait_type\":\"Head\",\"value\":\"Cowboy Hat\"}],\"description\":\"A collection 8888 Cute Chubby Pudgy Penquins sliding around on the freezing ETH blockchain.\",\"image\":\"ipfs://QmNf1UsmdGaMbpatQ6toXSkzDpizaGmC9zfunCyoz1enD5/penguin/8165.png\",\"name\":\"Pudgy Penguin #8165\"}",
"last_token_uri_sync": "2023-09-26T22:39:34.136Z",
"last_metadata_sync": "2023-10-13T10:22:08.029Z",
"minter_address": "0xbff79922fcbf93f9c30abb22322b271460c6bebb",
"normalized_metadata": {
"name": "Pudgy Penguin #8165",
"description": "A collection 8888 Cute Chubby Pudgy Penquins sliding around on the freezing ETH blockchain.",
"animation_url": null,
"external_link": null,
"image": "ipfs://QmNf1UsmdGaMbpatQ6toXSkzDpizaGmC9zfunCyoz1enD5/penguin/8165.png",
"attributes": [
{
"trait_type": "Background",
"value": "Tangerine",
"display_type": null,
"max_value": null,
"trait_count": 0,
"order": null
},
{
"trait_type": "Skin",
"value": "Normal",
"display_type": null,
"max_value": null,
"trait_count": 0,
"order": null
},
{
"trait_type": "Body",
"value": "Kimono Orange",
"display_type": null,
"max_value": null,
"trait_count": 0,
"order": null
},
{
"trait_type": "Face",
"value": "Squad",
"display_type": null,
"max_value": null,
"trait_count": 0,
"order": null
},
{
"trait_type": "Head",
"value": "Cowboy Hat",
"display_type": null,
"max_value": null,
"trait_count": 0,
"order": null
}
]
},
"media": {
"mimetype": "image/png",
"parent_hash": "0x9b326b3d983984f6cfc60a88d16ed3ed5774cc12f230c753509cf2e34485685d",
"status": "success",
"updatedAt": "2023-10-13T10:22:07.684Z",
"media_collection": {
"low": {
"height": 100,
"width": 100,
"url": "https://nft-preview-media.s3.us-east-1.amazonaws.com/evm/0x1/0xbd3531da5cf5857e7cfaa92426877b022e612cf8/0x96a9919f09d1df24d87658f4a8962c297587e2d4aab98e551081023b86c9d463/low.png"
},
"medium": {
"height": 250,
"width": 250,
"url": "https://nft-preview-media.s3.us-east-1.amazonaws.com/evm/0x1/0xbd3531da5cf5857e7cfaa92426877b022e612cf8/0x96a9919f09d1df24d87658f4a8962c297587e2d4aab98e551081023b86c9d463/medium.png"
},
"high": {
"height": 500,
"width": 500,
"url": "https://nft-preview-media.s3.us-east-1.amazonaws.com/evm/0x1/0xbd3531da5cf5857e7cfaa92426877b022e612cf8/0x96a9919f09d1df24d87658f4a8962c297587e2d4aab98e551081023b86c9d463/high.png"
}
},
"original_media_url": "ipfs://QmNf1UsmdGaMbpatQ6toXSkzDpizaGmC9zfunCyoz1enD5/penguin/8165.png"
},
"verified_collection": true
}
],
"status": "SYNCED"
}
``````js
const response = await Moralis.EvmApi.token.getWalletTokenBalances({
"chain": "0x1",
"address": "0x1f9090aaE28b8a3dCeaDf281B0F12828e676c326"
});
``````json
{
"token_address": "0x2d30ca6f024dbc1307ac8a1a44ca27de6f797ec22ef20627a1307243b0ab7d09",
"name": "Kylin Network",
"symbol": "KYL",
"logo": "https://cdn.moralis.io/eth/0x67b6d479c7bb412c54e03dca8e1bc6740ce6b99c.png",
"thumbnail": "https://cdn.moralis.io/eth/0x67b6d479c7bb412c54e03dca8e1bc6740ce6b99c_thumb.png",
"decimals": "",
"balance": "123456789",
"possible_spam": false,
"verified_collection": false
}
``````js
const response = await Moralis.EvmApi.marketData.getTopERC20TokensByMarketCap({});
``````json
[
{
"rank": "1",
"token_name": "Wrapped Ether",
"token_symbol": "WETH",
"token_logo": "https://cdn.moralis.io/eth/0xc02aaa39b223fe8d0a0e5c4f27ead9083c756cc2.png",
"token_decimals": "18",
"contract_address": "0xc02aaa39b223fe8d0a0e5c4f27ead9083c756cc2",
"price_usd": "0.0285",
"price_24h_percent_change": "0.0285",
"price_7d_percent_change": "0.0285",
"market_cap_usd": "0.0285"
}
]
``````js
const response = await Moralis.EvmApi.transaction.getTransactionVerbose({
"chain": "0x1",
"transactionHash": "0x012b9b98e21664117ec0b499d726a39f492ac8bd402cca8bebcbd163b9f75760"
});
``````json
{
"hash": "0x1ed85b3757a6d31d01a4d6677fc52fd3911d649a0af21fe5ca3f886b153773ed",
"nonce": "1848059",
"transaction_index": "108",
"from_address": "0x267be1c1d684f78cb4f6a176c4911b741e4ffdc0",
"to_address": "0x003dde3494f30d861d063232c6a8c04394b686ff",
"from_address_label": "Binance 1",
"to_address_label": "Binance 2",
"value": "115580000000000000",
"gas": "30000",
"gas_price": "52500000000",
"input": "0x",
"receipt_cumulative_gas_used": "4923073",
"receipt_gas_used": "21000",
"receipt_status": "1",
"block_timestamp": "2021-05-07T11:08:35.000Z",
"block_number": "12386788",
"block_hash": "0x9b559aef7ea858608c2e554246fe4a24287e7aeeb976848df2b9a2531f4b9171",
"logs": {
"log_index": "273",
"transaction_hash": "0xdd9006489e46670e0e85d1fb88823099e7f596b08aeaac023e9da0851f26fdd5",
"transaction_index": "204",
"address": "0x3105d328c66d8d55092358cf595d54608178e9b5",
"data": "0x00000000000000000000000000000000000000000000000de05239bccd4d537400000000000000000000000000024dbc80a9f80e3d5fc0a0ee30e2693781a443",
"topic0": "0x2caecd17d02f56fa897705dcc740da2d237c373f70686f4e0d9bd3bf0400ea7a",
"topic1": "0x000000000000000000000000031002d15b0d0cd7c9129d6f644446368deae391",
"topic2": "0x000000000000000000000000d25943be09f968ba740e0782a34e710100defae9",
"block_timestamp": "2021-05-07T11:08:35.000Z",
"block_number": "12386788",
"block_hash": "0x9b559aef7ea858608c2e554246fe4a24287e7aeeb976848df2b9a2531f4b9171",
"decoded_event": {
"signature": "Transfer(address,address,uint256)",
"label": "Transfer",
"type": "event",
"params": [
{
"name": "from",
"value": "0x26C5011483Add49801eA8E3Ee354fE013895aCe5",
"type": "address"
}
]
}
},
"decoded_call": {
"signature": "transfer(address,uint256)",
"label": "transfer",
"type": "function",
"params": [
{
"name": "_to",
"value": "0x1CA455A55108874A95C84620dDA2566c54D17953",
"type": "address"
}
]
},
"internal_transactions": {
"transaction_hash": "0x057Ec652A4F150f7FF94f089A38008f49a0DF88e",
"block_number": 12526958,
"block_hash": "0x0372c302e3c52e8f2e15d155e2c545e6d802e479236564af052759253b20fd86",
"type": "CALL",
"from": "0xd4a3BebD824189481FC45363602b83C9c7e9cbDf",
"to": "0xa71db868318f0a0bae9411347cd4a6fa23d8d4ef",
"value": "650000000000000000",
"gas": "6721975",
"gas_used": "6721975",
"input": "0x",
"output": "0x"
}
}
```

# Hash is a 32 byte binary string, represented by 0x prefixed hexadecimal.
scalar Hash
# Address is a 20 byte Opera address, represented as 0x prefixed hexadecimal number.
scalar Address
# BigInt is a large integer value. Input is accepted as either a JSON number,
# or a hexadecimal string alternatively prefixed with 0x. Output is 0x prefixed hexadecimal.
scalar BigInt
# Long is a 64 bit unsigned integer value.
scalar Long
# Bytes is an arbitrary length binary string, represented as 0x-prefixed hexadecimal.
# An empty byte string is represented as '0x'.
scalar Bytes
# Cursor is a string representing position in a sequential list of edges.
scalar Cursor
# Root schema definition
schema {
query: Query
mutation: Mutation
subscription: Subscription
}
# Entry points for querying the API
type Query {
"Total number of accounts active on the Opera blockchain."
accountsActive:Long!
"Get an Account information by hash address."
account(address:Address!):Account!
"""
Get list of Contracts with at most <count> edges.
If <count> is positive, return edges after the cursor,
if negative, return edges before the cursor.
For undefined cursor, positive <count> starts the list from top,
negative <count> starts the list from bottom.
ValidatedOnly specifies if the list should contain all the Contracts,
or just contracts with validated byte code and available source/ABI.
"""
contracts(validatedOnly: Boolean = false, cursor:Cursor, count:Int!):ContractList!
"""
Get block information by number or by hash.
If neither is provided, the most recent block is given.
"""
block(number:Long, hash: Hash):Block
"Get transaction information for given transaction hash."
transaction(hash:Hash!):Transaction
"""
Get list of Blocks with at most <count> edges.
If <count> is positive, return edges after the cursor,
if negative, return edges before the cursor.
For undefined cursor, positive <count> starts the list from top,
negative <count> starts the list from bottom.
"""
blocks(cursor:Cursor, count:Int!):BlockList!
"""
Get list of Transactions with at most <count> edges.
If <count> is positive, return edges after the cursor,
if negative, return edges before the cursor.
For undefined cursor, positive <count> starts the list from top,
negative <count> starts the list from bottom.
"""
transactions(cursor:Cursor, count:Int!):TransactionList!
"Get the id of the current epoch of the Opera blockchain."
currentEpoch:Long!
"""
Get information about specified epoch. Returns current epoch information
if id is not provided.
"""
epoch(id: Long!): Epoch!
"The last staker id in Opera blockchain."
lastStakerId: Long!
"The number of stakers in Opera blockchain."
stakersNum: Long!
"""
Staker information. The staker is loaded either by numeric ID,
or by address. null if none is provided.
"""
staker(id: Long, address: Address): Staker
"List of staker information from SFC smart contract."
stakers: [Staker!]!
"""
The list of delegations for the given staker ID.
Cursor is used to obtain specific slice of the staker's delegations.
The most recent delegations are provided if cursor is omitted.
"""
delegationsOf(staker:Long!, cursor: Cursor, count: Int = 25): DelegatorList!
"Get the details of a delegator by it's address."
delegation(address:Address!): Delegator
"Returns the current price per gas in WEI units."
gasPrice: Long!
"Get price details of the Opera blockchain token for the given target symbols."
price(to:String!):Price!
"""
Get calculated staking rewards for an account or given
staking amount in FTM tokens.
At least one of the address and amount parameters must be provided.
If you provide both, the address takes precedence and the amount is ignored.
"""
estimateRewards(address:Address, amount:Long):EstimatedRewards!
}
# Mutation endpoints for modifying the data
type Mutation {
"""
SendTransaction submits a raw signed transaction into the block chain.
The tx parameter represents raw signed and RLP encoded transaction data.
"""
sendTransaction(tx: Bytes!):Transaction
"""
Validate a deployed contract byte code with the provided source code
so potential users can check the contract source code, access contract ABI
to be able to interact with the contract and get the right metadata.
Returns updated contract information. If the contract can not be validated,
it raises a GraphQL error.
"""
validateContract(contract: ContractValidationInput!): Contract!
}
# Subscriptions to live events broadcasting
type Subscription {
"Subscribe to receive information about new blocks in the blockchain."
onBlock: Block!
"Subscribe to receive information about new transactions in the blockchain."
onTransaction: Transaction!
}
# StakerInfo represents extended staker information from smart contract.
type StakerInfo {
"Name represents the name of the staker."
name: String
"LogoUrl represents staker logo URL."
logoUrl: String
"Website represents a link to stakers website."
website: String
"Contact represents a link to contact to the staker."
contact: String
}
# DelegatorList is a list of delegations edges provided by sequential access request.
type DelegatorList {
"Edges contains provided edges of the sequential list."
edges: [DelegatorListEdge!]!
"""
TotalCount is the maximum number of delegations
available for sequential access.
"""
totalCount: BigInt!
"PageInfo is an information about the current page of delegation edges."
pageInfo: ListPageInfo!
}
# BlockListEdge is a single edge in a sequential list of blocks.
type DelegatorListEdge {
"Cursor defines a scroll key to this edge."
cursor: Cursor!
"Delegator represents the delegator provided by this list edge."
delegator: Delegator!
}
# Delegator represents a delegation on Opera blockchain.
type Delegator {
"Address of the delegator account."
address: Address!
"Identifier of the staker the delegation belongs to."
toStakerId: Long!
"Epoch in which the delegation was made."
createdEpoch: Long!
"Timestamp of the delegation creation."
createdTime: Long!
"Epoch in which the delegation was deactivated."
deactivatedEpoch: Long
"Timestamp of the deactivation of the delegation."
deactivatedTime: Long
"Amount delegated. It includes all the pending un-delegations."
amount: BigInt!
"""
Amount delegated. The current amount still registered
by SFC contract as delegated amount. It does include pending
deactivation, but does not include partial un-delegations.
"""
amountDelegated: BigInt
"Amount locked in pending un-delegations and withdrawals."
amountInWithdraw: BigInt!
"Amount of rewards claimed."
claimedReward: BigInt
"Pending rewards for the delegation."
pendingRewards: PendingRewards!
"List of withdraw requests of the delegation."
withdrawRequests: [WithdrawRequest!]!
"List of full delegation deactivation."
deactivation: [DeactivatedDelegation!]!
}
# Account defines block-chain account information container
type Account {
"Address is the address of the account."
address: Address!
"Balance is the current balance of the Account in WEI."
balance: BigInt!
"""
TotalValue is the current total value fo the account in WEI.
It includes available balance,
delegated amount and pending staking rewards.
"""
totalValue: BigInt!
"txCount represents number of transaction sent from the account."
txCount: Long!
"""
txList represents list of transactions of the account
in form of TransactionList.
"""
txList (cursor:Cursor, count:Int!): TransactionList!
"Details of a staker, if the account is a staker."
staker: Staker
"Details of delegation, if the account is a delegator."
delegation: Delegator
"Details about smart contract, if the account is a smart contract."
contract: Contract
}
# EstimatedRewards represents a calculated rewards estimation for an account or amount staked
type EstimatedRewards {
"Amount of FTM tokens expected to be staked for the calculation."
staked: Long!
"""
dailyReward represents amount of FTM tokens estimated
to be rewarded for staked amount in average per day.
"""
dailyReward: BigInt!
"""
weeklyReward represents amount of FTM tokens estimated
to be rewarded for staked amount in average per week.
"""
weeklyReward: BigInt!
"""
monthlyReward represents amount of FTM tokens estimated
to be rewarded for staked amount in average per month.
"""
monthlyReward: BigInt!
"""
yearlyReward represents amount of FTM tokens estimated
to be rewarded for staked amount in average per year.
"""
yearlyReward: BigInt!
"""
currentRewardYearRate represents average reward rate
for any staked amount in average per year.
The value is calculated as linear gross proceeds for staked amount
of tokens yearly.
"""
currentRewardRateYearly: Int!
"""
Total amount of staked FTM tokens used for the calculation in WEI units.
The estimation uses total staked amount, not the effective amount provided
by the last epoch. The effective amount does include current
un-delegations and also skips offline self-staking and flagged staking.
"""
totalStaked: BigInt!
"""
Information about the last sealed epoch of the Opera blockchain.
The epoch provides useful information about total FTM supply,
total amount staked, rewards rate and weight, fee, etc.
"""
lastEpoch: Epoch!
}
# TransactionList is a list of transaction edges provided by sequential access request.
type TransactionList {
# Edges contains provided edges of the sequential list.
edges: [TransactionListEdge!]!
# TotalCount is the maximum number of transactions available for sequential access.
totalCount: BigInt!
# PageInfo is an information about the current page of transaction edges.
pageInfo: ListPageInfo!
}
# TransactionListEdge is a single edge in a sequential list of transactions.
type TransactionListEdge {
cursor: Cursor!
transaction: Transaction!
}
# Transaction is an Opera block chain transaction.
type Transaction {
# Hash is the unique hash of this transaction.
hash: Hash!
# Nonce is the number of transactions sent by the account prior to this transaction.
nonce: Long!
# Index is the index of this transaction in the block. This will
# be null if the transaction is in a pending pool.
index: Long
# From is the address of the account that sent this transaction
from: Address!
# Sender is the account that sent this transaction
sender: Account!
# To is the account the transaction was sent to.
# This is null for contract creating transactions.
to: Address
# contractAddress represents the address of smart contract deployed by this transaction;
# null if the transaction is not contract creation
contractAddress: Address
# Recipient is the account that received this transaction.
# Null for contract creating transaction.
recipient: Account
# Value is the value sent along with this transaction in WEI.
value: BigInt!
# GasPrice is the price of gas per unit in WEI.
gasPrice: BigInt!
# Gas represents gas provided by the sender.
gas: Long!
# GasUsed is the amount of gas that was used on processing this transaction.
# If the transaction is pending, this field will be null.
gasUsed: Long
# InputData is the data supplied to the target of the transaction.
# Contains smart contract byte code if this is contract creation.
# Contains encoded contract state mutating function call if recipient
# is a contract address.
inputData: Bytes!
# BlockHash is the hash of the block this transaction was assigned to.
# Null if the transaction is pending.
blockHash: Hash
# BlockHash is the hash of the block this transaction was assigned to.
# Null if the transaction is pending.
blockNumber: Long
# Block is the block this transaction was assigned to. This will be null if
# the transaction is pending.
block: Block
# Status is the return status of the transaction. This will be 1 if the
# transaction succeeded, or 0 if it failed (due to a revert, or due to
# running out of gas). If the transaction has not yet been processed, this
# field will be null.
status: Long
}
# Represents epoch information.
type Epoch {
"Number the epoch end."
id: Long!
"Timestamp of the epoch end."
endTime: BigInt!
"Epoch duration in seconds."
duration: BigInt!
"Fee at the epoch."
epochFee: BigInt!
"Total base reward weight on epoch."
totalBaseRewardWeight: BigInt!
"Total transaction reward weight on epoch."
totalTxRewardWeight: BigInt!
"Base reward per second of epoch."
baseRewardPerSecond: BigInt!
"Total amount staked."
stakeTotalAmount: BigInt!
"Total amount delegated."
delegationsTotalAmount: BigInt!
"Total supply amount."
totalSupply: BigInt!
}
# ContractList is a list of smart contract edges provided by sequential access request.
type ContractList {
# Edges contains provided edges of the sequential list.
edges: [ContractListEdge!]!
# TotalCount is the maximum number of contracts available for sequential access.
totalCount: BigInt!
# PageInfo is an information about the current page of contract edges.
pageInfo: ListPageInfo!
}
# TransactionListEdge is a single edge in a sequential list of transactions.
type ContractListEdge {
cursor: Cursor!
contract: Contract!
}
# Price represents price information of core Opera token
type Price {
"Source unit symbol."
fromSymbol: String!
"Target unit symbol."
toSymbol: String!
"Price of the source symbol unit in target symbol unit."
price: Float!
"Price change in last 24h."
change24: Float!
"Price change in percent in last 24h."
changePct24: Float!
"Open 24h price."
open24: Float!
"Highest 24h price."
high24: Float!
"Lowest 24h price."
low24: Float!
"Volume exchanged in last 24h price."
volume24: Float!
"Market cap of the source unit."
marketCap: Float!
"Timestamp of the last update of this price value."
lastUpdate: Long!
}
# Represents staker information.
type Staker {
"Id number the staker."
id: Long!
"Staker address."
stakerAddress: Address!
"Amount of total staked tokens in WEI."
totalStake: BigInt
"Amount of own staked tokens in WEI."
stake: BigInt
"Amount of tokens delegated to the staker in WEI."
delegatedMe: BigInt
"""
Maximum total amount of tokens allowed to be delegated
to the staker in WEI.
This value depends on the amount of self staked tokens.
"""
totalDelegatedLimit: BigInt!
"""
Maximum amount of tokens allowed to be delegated to the staker
on a new delegation in WEI.
This value depends on the amount of self staked tokens.
"""
delegatedLimit: BigInt!
"Is this a validator record."
isValidator: Boolean!
"Is the staker active."
isActive: Boolean!
"Is the staker considered to be cheater."
isCheater: Boolean!
"Is the staker offline."
isOffline: Boolean!
"Epoch in which the staker was created."
createdEpoch: Long!
"Timestamp of the staker creation."
createdTime: Long!
"Epoch in which the staker was deactivated."
deactivatedEpoch: Long!
"Timestamp of the staker deactivation."
deactivatedTime: Long!
"How many blocks the staker missed."
missedBlocks: Long!
"Number of seconds the staker is offline."
downtime: Long!
"Proof of importance score."
poi: BigInt
"Base weight for rewards distribution."
baseRewardWeight: BigInt
"Weight for transaction rewards distribution."
txRewardWeight: BigInt
"Validation score."
validationScore: BigInt
"Origination score."
originationScore: BigInt
"Amount of rewards claimed in WEI."
claimedRewards: BigInt
"Amount of rewards claimed by delegators in WEI."
delegationClaimedRewards: BigInt
"""
List of delegations of this staker. Cursor is used to obtain specific slice
of the staker's delegations. The most recent delegations
are provided if cursor is omitted.
"""
delegations(cursor: Cursor, count: Int = 25):DelegatorList!
"""
Status is a binary encoded status of the staker.
Ok = 0, bin 1 = Fork Detected, bin 256 = Validator Offline
"""
status: Long!
"StakerInfo represents extended staker information from smart contract."
stakerInfo: StakerInfo
"""
List of withdraw requests of the stake.
Contains only withdrawal requests of the staking account,
not the requests of the stake delegators.
"""
withdrawRequests: [WithdrawRequest!]!
}
# PendingRewards represents a detail of pending rewards for staking and delegations
type PendingRewards {
"Pending rewards amount."
amount: BigInt!
"The first unpaid epoch."
fromEpoch: Long!
"The last unpaid epoch."
toEpoch: Long!
}
# WithdrawRequest represents a request for partial stake withdraw.
type WithdrawRequest {
"Address of the authorized request."
address: Address!
"Address of the receiving account."
receiver: Address!
"Account receiving the withdraw request."
account: Account!
"Staker Id of the staker involved in the withdraw request."
stakerID: Long!
"Details of the staker involved in the withdraw request."
staker: Staker!
"Unique withdraw request identifier."
withdrawRequestID: BigInt!
"Is this a partial delegation withdraw, or staker withdraw?"
isDelegation: Boolean!
"Amount of WEI requested to be withdrawn."
amount: BigInt!
"Block in which the withdraw request was registered."
requestBlock: Block!
"""
Block in which the withdraw request was finalized.
The value is NULL for pending request.
"""
withdrawBlock: Block
"""
Amount of WEI slashed as a penalty for cheating.
The penalty is applied not only to staker withdraw,
but also to delegations of a cheating staker.
The value is NULL for pending requests.
"""
withdrawPenalty: BigInt
}
# DeactivatedDelegation represents a prepared delegation full withdraw.
# Fully withdrawn delegations must be prepared first and finalized
# only after the lock down period passes.
type DeactivatedDelegation {
"Address of the delegator."
address: Address!
"Staker Id of the staker involved in the withdraw request."
stakerID: Long!
"Details of the staker involved in the withdraw request."
staker: Staker!
"Block in which the delegation deactivation was registered."
requestBlock: Block!
"""
Block in which the delegation was withdrawn.
The value is NULL for pending request.
"""
withdrawBlock: Block
"""
Amount of WEI slashed as a penalty for cheating.
The penalty is applied to delegators' rewards
in case their staker is flagged.
The value is NULL for pending requests.
"""
withdrawPenalty: BigInt
}
# Block is an Opera block chain block.
type Block {
# Number is the number of this block, starting at 0 for the genesis block.
number: Long!
# Hash is the unique block hash of this block.
hash: Hash!
# Parent is the parent block of this block.
parent: Block
# TransactionCount is the number of transactions in this block.
transactionCount: Int
# Timestamp is the unix timestamp at which this block was mined.
timestamp: Long!
# txHashList is the list of unique hash values of transaction
# assigned to the block.
txHashList: [Hash!]!
# txList is a list of transactions assigned to the block.
txList: [Transaction!]!
}
# Contract defines block-chain smart contract information container
type Contract {
"Address represents the contract address."
address: Address!
"DeployedBy represents the smart contract deployment transaction reference."
deployedBy: Transaction!
"transactionHash represents the smart contract deployment transaction hash."
transactionHash: Hash!
"Smart contract name. Empty if not available."
name: String!
"Smart contract version identifier. Empty if not available."
version: String!
"""
License specifies an open source license the contract was published with.
Empty if not specified.
"""
license: String!
"Smart contract author contact. Empty if not available."
supportContact: String!
"Smart contract compiler identifier. Empty if not available."
compiler: String!
"Smart contract source code. Empty if not available."
sourceCode: String!
"Smart contract ABI definition. Empty if not available."
abi: String!
"""
Validated is the unix timestamp at which the source code was validated
against the deployed byte code. Null if not validated yet.
"""
validated: Long
"Timestamp is the unix timestamp at which this smart contract was deployed."
timestamp: Long!
}
# ContractValidationInput represents a set of data sent from client
# to validate deployed contract with the provided source code.
input ContractValidationInput {
"Address of the contract being validated."
address: Address!
"Optional smart contract name. Maximum allowed length is 64 characters."
name: String
"Optional smart contract version identifier. Maximum allowed length is 14 characters."
version: String
"Optional smart contract author contact. Maximum allowed length is 64 characters."
supportContact: String
"""
License specifies an open source license the contract was published with.
Empty if not specified.
"""
license: String
"Optimized specifies if the compiler was set to optimize the byte code."
optimized: Boolean = true
"""
OptimizeRuns specifies number of optimization runs the compiler was set
to execute during the byte code optimizing.
"""
optimizeRuns: Int = 200
"Smart contract source code."
sourceCode: String!
}
# BlockList is a list of block edges provided by sequential access request.
type BlockList {
# Edges contains provided edges of the sequential list.
edges: [BlockListEdge!]!
# TotalCount is the maximum number of blocks available for sequential access.
totalCount: BigInt!
# PageInfo is an information about the current page of block edges.
pageInfo: ListPageInfo!
}
# BlockListEdge is a single edge in a sequential list of blocks.
type BlockListEdge {
cursor: Cursor!
block: Block!
}
# ListPageInfo contains information about a sequential access list page.
type ListPageInfo {
# First is the cursor of the first edge of the edges list. null for empty list.
first: Cursor
# Last if the cursor of the last edge of the edges list. null for empty list.
last: Cursor
# HasNext specifies if there is another edge after the last one.
hasNext: Boolean!
# HasNext specifies if there is another edge before the first one.
hasPrevious: Boolean!
}